Clyde Biochemistry Laboratories (those based at Royal Alexandra Hospital, Inverclyde Royal Hospital and Vale of Leven Hospital) has been accredited with UKAS to standard ISO 15189:2012 for much of our test repertoire. The certificate of accreditation is available online.
The scope of our accreditation includes the majority of the tests performed by our laboratories, with a small number of tests not falling within our accreditation status (for example, no fluid analyses (on fluids other than CSF, urine or blood / serum / plasma) are accredited) – see the link above for details of our accredited scope.
Specialist services including Protein Electrophoresis and less often requested endocrine assays are based at RAH.
All routine GP work within the Clyde Sector is also based at RAH.
Please accept our apologies for the behaviour of links on this webpage. This is due to a global setting which is outwith the Biochemistry Department’s control.
We are committed to providing a quality service to users. If you wish to provide feedback on the Clyde Glasgow Biochemistry service, please contact our Quality Manager by emailing Pamela.craig6@nhs.scot
The Human Fertilisation and Embryology Authority (HFEA) are the Government regulatory body for all fertility clinics in the UK. They collect data on all treatment cycles started and outcomes of those treatments, including success rates.
They are currently updating their clinic data submission system and once complete in 2025, you will be able to see data on treatments from January 2020 to December 2023, and births from January 2019 to December 2022.
In the meantime, you can visit their clinic profile for Glasgow Royal Infirmary ACS for the most recent inspection ratings, reviews and verified success rates. We advise patients not to rely solely on success rates when comparing fertility clinics or deciding where to seek treatment.
Please note, not all patients will require all tests. Your nurse or doctor will advise on which ones you’ll need, depending on which treatment you’re having.
Transvaginal Scan (TVS)
All patients having fertility treatment should have a transvaginal scan (TVS) as part of fertility investigations to assess the health of the uterus and ovaries. It can help identify potential issues like endometrial polyps, uterine abnormalities or ovarian cysts. It involves inserting a small, lubricated probe into the vagina. The probe emits high-frequency sound waves that create detailed images of the pelvic organs on a monitor. This allows us to see the uterus, ovaries, and fallopian tubes more clearly than with a transabdominal scan. While some individuals may experience slight discomfort, the procedure is usually well-tolerated and not painful.
It can:
check the size, shape, and condition of the uterus and ovaries, checking for abnormalities like fibroids or cysts.
assess the number and size of antral follicles, which are small fluid-filled sacs in the ovaries that contain eggs, providing an indication of ovarian reserve.
Before the scan you will be asked to go into the toilet adjoining the scan room, empty your bladder and remove clothing from the bottom half of your body. You will be given a gown to cover your body. You may also have a TVS as part of a HyCoSy.
Semen Analysis
Semen analysis is a routine part of an infertility investigation. A few parameters are examined to determine the quality of semen. This includes the sperm concentration (the number of sperm), motility (how well the sperm are moving) and morphology (the shape of the sperm).
The results of the analysis help us to determine whether a ‘male factor’ plays a part in the reason why you have not conceived naturally. Several factors can influence the quality of the sample. You may be asked to provide more than one sample if the initial results are not within normal ranges. This is common and helps us to make an accurate diagnosis.
Initially, you should contact your GP to arrange referral for semen analysis.
Anti-Mullerian Hormone (AMH)
Anti-Mullerian Hormone (AMH) is a blood test used to assess ovarian reserve. AMH is made in the ovarian follicles, which contain eggs, and its levels can be checked at any time during the menstrual cycle. Blood levels of this hormone are measured to assess the remaining ovarian reserve (egg supply) in your ovaries.
How is an ‘AMH’ test result used?
This result will be used to help decide which treatment protocol you will follow during treatment.
We will also use it to counsel you on how likely you are to respond to certain treatments, such as hormonal stimulation during IVF.
If you are between 40-42 years old, AMH will be used as one of the criteria to assess if you are eligible for NHS funding.
A high AMH level raises the possibility that you may over-respond to your treatment (i.e. too many eggs will be produced), increasing the risk of ovarian hyperstimulation syndrome (OHSS). Ovarian hyperstimulation syndrome (OHSS) | RCOG
A low AMH level raises the possibility that you may respond poorly, or not at all, to hormonal stimulation. This means a low number of eggs, or none, may be produced.
Full Blood Count (FBC)
A full blood count (FBC) test is taken to look for abnormalities such as Anaemia – this means that you have fewer red blood cells than normal or have less haemoglobin than normal in each red blood cell.
Cytomegalovirus (CMV) – NHS is a virus which can cause flu like symptoms. If you catch CMV while pregnant there is a risk to the baby. CMV can be present in body fluids, such as sperm. We test patients for immunity to CMV when using donor sperm. If you are immune to CMV, sperm can be used from a CMV positive or negative donor. If you are not immune to CMV the nurse or embryologist will advise on risks of using a CMV positive donor.
Chlamydia Testing
Chlamydia – NHS is one of the most common sexually transmitted bacterial infections and affects both men and women. It often does not cause any obvious symptoms. The disease can be spread during genital contact or unprotected sexual intercourse (including anal and oral sex) with an infected person or from an infected mother to her baby during childbirth. You will either be asked to provide a vaginal swab or sample of urine, depending on treatment type. Should your screening test show that you are infected with chlamydia, you will be offered antibiotic treatment to clear it and encouraged to take precautions to reduce the risks of passing it onto others.
High Vaginal Swab
You will be asked to provide a vaginal swab to test for infections such as thrush, bacterial vaginosis, trichomoniasis and group b streptococcus.
Cervical Screening
All women between the age of 25 and 60 are invited to attend for cervical screening. Cervical screening aims to detect and treat abnormal changes in a woman’s cervix (the neck of the womb). If left untreated, this may develop into cervical cancer. It is essential that prior to commencing your treatment you have an up-to-date cervical smear test.
If you have this done as part of NHS Scotland screening programme, we will be able to access your most recent result and advice. If you have had it done in a different country or privately, please bring a copy of your test result to your first appointment with the nurses. If you are over 25 and have never had a smear test, please arrange to have this done via your GP.
Human Immunodeficiency Virus (HIV)
HIV attacks your immune system eventually stopping it altogether, at which point it becomes difficult to combat serious life threatening infections. The virus can be spread during unprotected sexual intercourse (including oral and anal sex) with an infected person and by sharing needles to inject illegal drugs. Infected mothers can transmit the virus to their baby before or during childbirth. Should your screening test show that you are infected with HIV, you will be offered treatment(s) designed to reduce the harmful effects of the virus and encouraged to take precautions to reduce the risks of passing it onto others.
Hepatitis B
Hepatitis B is a virus that can cause inflammation (swelling and tenderness) of the liver. It can take a long time for the symptoms to show. The virus can be spread during unprotected sexual intercourse with an infected person and by sharing needles to inject illegal drugs. Infected mothers can transmit the virus to their baby during childbirth. Should your screening test show that you are infected with Hepatitis B, you will be offered treatment(s) designed to reduce the harmful effects of the virus and encouraged to take precautions to reduce the risks of passing it onto others.
Hepatitis C
Hepatitis C is also a virus that can cause serious damage to the liver. It can take a long time for the symptoms to show. The virus is mainly spread through contact with the blood of an infected person. Rarely, the disease is passed through other body fluids. For example, during unprotected sexual intercourse with an infected person or from an infected mother to her baby before or during childbirth. Should your screening test show that you are infected with Hepatitis C, you will be offered treatment(s) designed to reduce the harmful effects of the virus.
Your first visit
Most clinic appointments are being carried out over the phone. At your first consultation a Specialist Fertility Nurse or a Doctor wil phone you, take a detailed medical history from you both and ask for your current BMI. This appointment will last around 30 minutes. They will recommend any further investigations, treatments or advise if you are not eligible for NHS treatment.
If your clinic appointment is in person please attend the ACS unit at Glasgow Royal Infirmary. We may weigh you, do an internal scan and take some blood samples.
Please note that to be eligible for NHS funded treatment you must meet the criteria set by the Scottish Government
Each treatment has its own waiting list, so times will vary depending on which treatment you’re having. The nurse or doctor at your clinic appointment will be able to let you know estimated waiting times for you.
When your name reaches the top of the treatment waiting list we will send you a letter with your first ART appointment, around 4 to 6 weeks later.
ART Appointment
Before this appointment you will be sent information about:
Setting up e-consent profiles for both partners
Doing vaginal swabs
Asking your GP for proof of your MMR vaccinations
Making sure your smear is up to date
Please ensure you have read all of the information provided and have started to prepare for the appointment. This will help to prevent delays to treatment starting. If you have a male partner and their semen analysis was more than 18 months ago, they should contact their GP to have this repeated.
Your partner is welcome to attend this appointment but we don’t need to see them at this stage.
At the ART appointment (which takes about 30 minutes to complete) You will meet with a Nurse who will:
take blood samples for tests that are required (AMH, haemoglobinopathy, CMV etc)
check your BMI. At this stage BMI must be 18.5-30 to proceed.
take the vaginal swabs from you
ask some questions about you and your partner
give details about our conselling service
give you the date and time for your next appointment
Around 2 weeks after this, the 2nd part of your e-consents will be sent to you both separately and must be completed 24 hours before the post screen appointment to give the nurses time to check them before they speak to you.
Post Screen Appointment
This will be an attend anywhere video call. Please ensure you’re both present and have good data or WiFi connection. At the Post Screen appointment (which takes about 30 minutes to complete) you will meet with a Nurse who will:
review your medical history
discuss your test results
discuss any corrections that need to be made to your consent forms
explain your protocol and how to book a cycle of treatment
answer any questions you may have
Was this helpful?
Yes
No
Thanks for your feedback!
Was this helpful?
Thanks for your feedback!
Please visit NHS Inform for the most recent advice on the coronavirus (COVID-19) vaccine and pregnancy. Here you will find information specific to those in the process of having fertility treatment.
Update Friday 11th March 2022
On the 7th January 2022 it was nationally agreed that fertility treatment for unvaccinated women would be deferred with immediate effect. This recommendation was reviewed, as planned, alongside emerging evidence of risk and the prevailing levels of COVID-19, during January and February 2022.
Data from PHS demonstrates that both COVID-19 cases and hospitalisations are stabilising, and a reduced proportion of cases are resulting in hospitalisations, following the emergence of Omicron as the dominant variant. While data specifically on pregnant women is very limited, the available data on unvaccinated individuals suggests that the risk of severe disease requiring hospital or critical care admission has reduced over the last four to six weeks. Therefore, it has been determined that fertility treatment for unvaccinated patients will no longer be deferred.
The JCVI (Joint Committee on Vaccination and Immunisation) advice on vaccinating pregnant women, namely that pregnant women should now be considered as a clinical risk group and part of priority group 6 within the vaccination programme remains the same. Therefore, we will continue to fully inform patients, prior to their treatment, of the evidence concerning the safety of vaccines in those planning pregnancy, undergoing fertility treatment and the pregnant population in respect of maternal and perinatal outcomes, including evidence for continued vaccine effectiveness against symptomatic COVID-19 disease. Furthermore, we will continue to advise patients at the start of the fertility pathway, and at every opportunity thereafter (making every contact count) about the risks of non-vaccination.
In line with the reviews recommendations, we will also ask patients to sign an informed consent form acknowledging that they are aware of the risks prior to treatment, similar to other aspects of the fertility pathway.
The COVID-19 vaccines are safe and effective and there is no evidence to suggest that the COVID-19 vaccines will affect fertility in women or men.
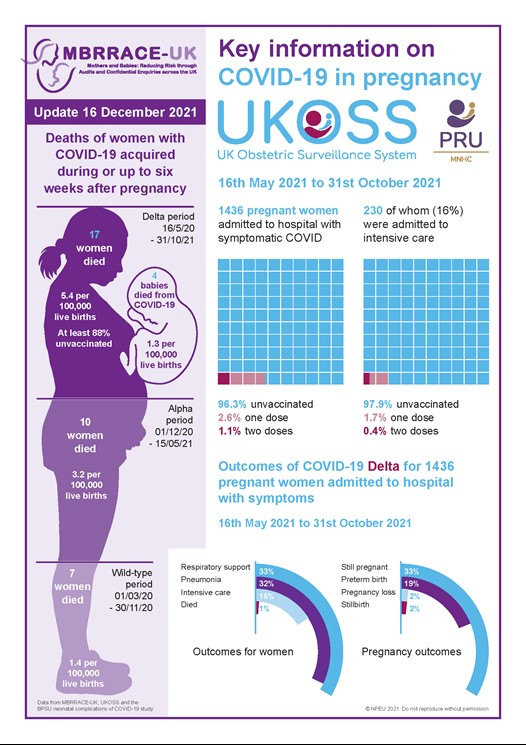
The Scottish Intensive Care Society Report, published on 13 October, highlighted that of the 89 COVID-19 positive pregnant women who were admitted to critical care between December 2020 and end September 2021, 88 were unvaccinated, 1 was partially vaccinated, and none were fully vaccinated. Wave 3 has seen increased numbers of pregnant women being admitted to hospital with moderate to severe COVID-19 symptoms requiring critical care, with clinicians reporting a particular peak in September.
On 16 December, the Scottish Government, Chief Medical Officer, Dr Gregor Smith wrote to NHS Chief Executives highlighting recent updates to the Joint Committee on Vaccination and Immunisation advice on vaccinating pregnant women, namely that pregnant women should now be considered as a clinical risk group and part of priority group 6 within the vaccination programme.
In addition to this, the latest evidence from the UK Obstetric Surveillance System (UKOSS) and the Mothers and Babies: Reducing Risk through Audits and Confidential Enquiries across the UK (MBRRACE-UK) shows that unvaccinated pregnant women and their babies have died after admission to hospital with Covid-19 and 98 % of pregnant women in ICU with Covid-19 are unvaccinated. We also know that of all the women who have died during pregnancy or up to 6 weeks after birth, 88% of them were unvaccinated.
In light of the above evidence, the speed at which the Omicron variant is spreading through communities and the safety of pregnant women and their babies, it has been nationally agreed that fertility treatment for unvaccinated women will be deferred with immediate effect. We will review this decision during February 2022 or earlier if appropriate. Older women who have their treatment deferred, will have the deferral time added back on to their fertility journey to ensure that they do not lose out on eligibility for treatment due to their age.
Women who are within 12 weeks of having their second Covid vaccine dose or who have had their booster will continue their treatment as normal. For those who have recently had or are about to receive their booster vaccination, treatment can begin 10 days after the booster vaccination has been received. Positions on waiting lists will not be penalised if extra time is needed for vaccination.
Further information regarding the Omicron variant will continue to become available and any changes to current guidance will be communicated as soon as it becomes available.
For further information regarding covid vaccination in pregnancy and breastfeeding, please see the following link:
1. How long the treatment will be deferred / postponed?
Treatment will be deferred until February 2022 at which point the advice will be reviewed to determine if treatment can recommence of whether further deferral will be required.
2. If the risks are in pregnancy, why does my partner status matter?
If your partner gets infected you will be exposed to risk of infection. If you are a confirmed contact you will then need to isolate and will be unable to attend for monitoring/ treatment.
3. It is our personal choice to get vaccinate. Why are you forcing us to get vaccinated?
It is still your personal choice as to whether to have the vaccine, all we are saying is that we cannot proceed with treatment without evidence of vaccination due to the risks involved.
JCVI (Joint Committee on Vaccination and Immunisation) has put pregnant women in high risk category.
RCOG (Royal College of Obstetricians and Gynaecologists), RCM (Royal College of Midwives), Scottish Government all are advising vaccination, including boosters for pregnant women.
4. Is it for all fertility treatment or only IVF?
The guidance relates to all fertility treatment and not IVF alone.
5. I am self-funding, why does policy apply to me?
As this is based on clear clinical advice around the risks for this group of women and the decision is based on protecting this group, this policy applies to all patients having treatment in Centres, not just NHS patients.
6. Will I have to provide evidence?
Yes. Please download the app. This will be checked when you come in to the centre.
7. If I wait, I will be more than 40. This will compromise my funding status
No this will not compromise your funding status. All patients having treatment deferred will have the deferral time added back on to their treatment journey to ensure that no patient loses out on treatment due to their age.
8. Can I go through stimulation and freeze embryos?
The same concerns around infection during treatment and subsequent cancellation of the cycle prior to egg collection apply.
9. Will there be further deferral?
We don’t know at this stage. The available data will be reviewed in February.
Was this helpful?
Yes
No
Thanks for your feedback!
Was this helpful?
Thanks for your feedback!
The Assisted Conception Service at Glasgow Royal Infirmary is a state of the art facility providing assisted conception services to patients throughout Scotland. The service has operated since 1983 and benefitted from a multi-million pound investment in 2014, enabling delivery of innovative assisted conception technologies in a modern purpose built accommodation.
All treatments we provide are NHS services and are individually tailored to meet your needs. In addition, in partnership with the Glasgow Royal Fertility Clinic, we provide services for those who wish to consider self funding their treatment.
Please browse our pages for more information about the services we offer and Frequently Asked Questions (FAQ).
You can also take a virtual tour of the ACS department by watching the below video.
Travel Restrictions for Assisted Conception Service Patients
Travelling abroad increases the risk of exposure to infections such as zika virus, west nile virus and dengue fever. The ACS must follow strict guidance on treating people who are at risk of exposure to certain infections.
If you travel to an affected country, you will not be able to start treatment within the recommended timeframes.
Fortunately for most people, treatment will be able to proceed as normal as long as you do not become unwell.
If you are thinking of travelling abroad while attending the ACS for treatment, please ensure you find out about the infection risk in that country and how it may affect your treatment starting. See the Department of Health website and search each country for area specific risks NaTHNaC – Country List
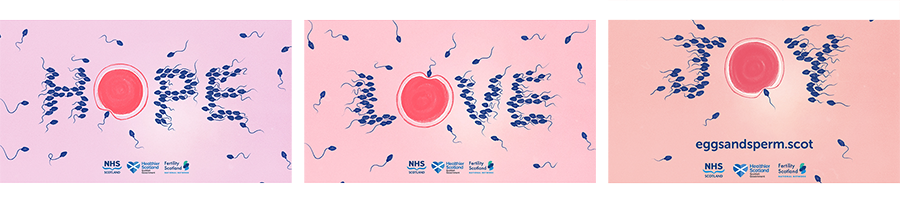
Egg and Sperm Donation Campaign
Hundreds of people in Scotland need the help of egg or sperm donors to give them the chance to become parents and the gift of starting a family. Visit the egg and sperm website to find out more.
Donating your eggs or sperm is something that requires careful consideration, but if it’s right for you then you have the potential to give the joy of starting a family to those people in Scotland, who need the help of donors to become parents.
We use cookies to analyse traffic to our site and to enable certain functions such as forms and embedded videos. These do not collect personal information. By clicking "Accept All", you consent to our use of cookies, or you can customise the options.
This website uses cookies
Websites store cookies to enhance functionality and personalise your experience. You can manage your preferences, but blocking some cookies may impact site performance and services.
Essential cookies enable basic functions and are necessary for the proper function of the website.
Name
Description
Duration
Cookie Preferences
This cookie is used to store the user's cookie consent preferences.
30 days
CloudFlare provides web performance and security solutions, enhancing site speed and protecting against threats.
Sequence rules uses cookies to track the order of requests a user has made and the time between requests and makes them available via Cloudflare Rules. This allows you to write rules that match valid or invalid sequences. The specific cookies used to validate sequences are called sequence cookies.
session
cf_ob_info
The cf_ob_info cookie provides information on: The HTTP Status Code returned by the origin web server. The Ray ID of the original failed request. The data center serving the traffic
session
cf_chl_rc_m
These cookies are for internal use which allows Cloudflare to identify production issues on clients.
session
__cfruid
Used by the content network, Cloudflare, to identify trusted web traffic.
session
__cf_bm
Cloudflare's bot products identify and mitigate automated traffic to protect your site from bad bots. Cloudflare places the __cf_bm cookie on End User devices that access Customer sites that are protected by Bot Management or Bot Fight Mode. The __cf_bm cookie is necessary for the proper functioning of these bot solutions.
session
__cflb
When enabling session affinity with Cloudflare Load Balancer, Cloudflare sets a __cflb cookie with a unique value on the first response to the requesting client. Cloudflare routes future requests to the same origin, optimizing network resource usage. In the event of a failover, Cloudflare sets a new __cflb cookie to direct future requests to the failover pool.
session
_cfuvid
The _cfuvid cookie is only set when a site uses this option in a Rate Limiting Rule, and is only used to allow the Cloudflare WAF to distinguish individual users who share the same IP address.
session
cf_clearance
Whether a CAPTCHA or Javascript challenge has been solved.
session
cf_use_ob
The cf_use_ob cookie informs Cloudflare to fetch the requested resource from the Always Online cache on the designated port. Applicable values are: 0, 80, and 443. The cf_ob_info and cf_use_ob cookies are persistent cookies that expire after 30 seconds.
session
__cfwaitingroom
The __cfwaitingroom cookie is only used to track visitors that access a waiting room enabled host and path combination for a zone. Visitors using a browser that does not accept cookies cannot visit the host and path combination while the waiting room is active.
session
cf_chl_rc_i
These cookies are for internal use which allows Cloudflare to identify production issues on clients.
session
cf_chl_rc_ni
These cookies are for internal use which allows Cloudflare to identify production issues on clients.
session
Statistics cookies collect information anonymously. This information helps us understand how visitors use our website.
We use Microsoft Clarity to understand how users interact with our website, including information such as clicks, scrolling and navigation behaviour, to help improve our services.
Microsoft Clarity uses cookies and similar technologies. These are only set if you accept analytics cookies.
If you choose not to accept analytics cookies, Clarity will operate in a limited mode using non-cookie-based data, which does not track users across pages or visits.
The data collected is behavioural and technical in nature and does not directly identify individuals. Sensitive information such as names, email addresses and form inputs is automatically hidden and not recorded or viewed.
Some information, such as device and approximate location data will still be collected and is treated as personal data in accordance with data protection legislation.
This will not be used for any purpose other than analytics and will not be used to identify you.